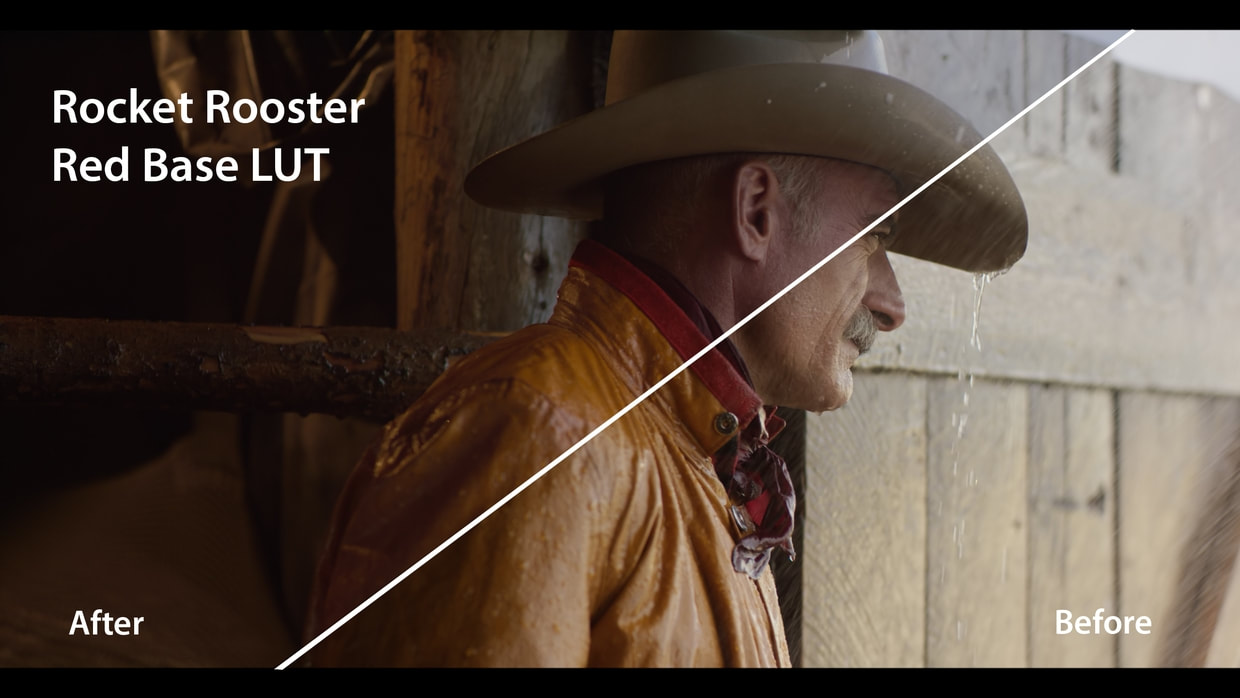
ROCKET ROOSTER
  • Home
    • STORE
    • Rooster Blog
  • Filmmaker
    • FILM LABS LUTS
  • PHOTOGRAPHER
  • Contact

3 Tips for better skin tones

8/17/2022

1 Comment

 
Picture
BEFORE
AFTER
Getting great-looking skin tones can seem elusive sometimes. But here are 3 quick and easy tips to get you going in less than 10 minutes.

1. You NEED to white balance!

In order for us to get great-looking skin tones, it is vital that we have the right starting point. A good white balance can change the quality of your grade a lot. In the example below, see how much better our skin looks once we move away from the greenish cast into a more balanced image.
Here, I use the offset in resolve, but you can use whatever tools you are comfortable with, the temperature and tint sliders work fine too.
I can’t stress it enough, a good white balance is key and possibly a topic for another article down the road.
Picture
Picture

2. Your skin is a little orange

Picture
So let me explain. We are all a variation of the same colour, no matter what race you are. Here, represented on the vectorscope’s  “skin tone line” you can see that skin should sit somewhere in between red (marked R) and yellow (marked Y) so orange! Ideally, what you want is for your skin tones to sit along the “skin tone line” on your vectorscope.
Picture
It is a good idea to isolate the skin in your NLE or grading software of choice so that you can assess the skin tones and only the skin tones. That way, you can dial in just the right amount to get the skin looking exactly the way you want. This is also useful if you only want to work on the skin and nothing else in the image.
Picture

3. Add some POP!

Making your skin stand out is the difference between a good grade and a great one. Here’s a quick and easy trick to get your skin to stand out more.
Using the skin isolation you made earlier, crank up some contrast and a touch of saturation. A little goes a long way. Here I used the contrast, pivot, and saturation slider just to keep things simple. There are several ways you can do this and there is no real “correct” way. In the before and after examples below, I use a different method each time to add pop, it’s all the same.

Picture

More samples using the 3 steps above

Check out some great LUTs that are designed to give your camera a better Rec709 in just one click.

Rocket Rooster ZCam E2 Base LUT

Picture

Rocket Rooster GEN 5 LUTs for Blackmagic

Picture

Rocket Rooster V LOG Base LUT

Picture

Red Base LUTs

Picture
1 Comment
Pierre Mercer link
7/11/2024 12:54:04 am

Hi thanks for posting thiss

Reply


Leave a Reply.

    RSS Feed

    Archives

    October 2022
    August 2022
    July 2022

Rocket Rooster 
Tools for Digital Cinema

BECOME AN AFFILIATE

PRIVACY POLICY
Picture
Check out Rocket Rooster 
Products Here 

NOTE: ALL SALES ARE FINAL, NO REFUNDS. ROCKET ROOSTER PRODUCTS ARE ONLY AVAILABLE FOR DIGITAL DOWNLOAD
  • Home
    • STORE
    • Rooster Blog
  • Filmmaker
    • FILM LABS LUTS
  • PHOTOGRAPHER
  • Contact